Catweasel ISA online manual
Software installation, basic usage
Quick links:
In-depth description of the tools
Reading 1541 reverse sides
The software for the Catweasel controller needs to be installed manually. There is no installation script to help you, so you need some experience with either the Windows explorer, or the DOS commands.
First, make a directory called "catwsl" on your C: drive. This can be done by selecting the C: drive in your explorer (click on it once) and then click on the menu "File". A menu drops down, now place your mouse pointer over "new" and a new menu opens. The first item in that menu lets you make a new drawer, click on it once and enter the name "catwsl" for the new drawer. The first step is now completed, you have created a drawer in the c: drive.
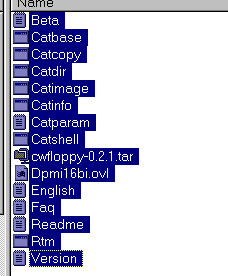
Now insert the included Catweasel driverdisk in your A: drive, and click on the drive in Explorer. A list of the files will apear in the right window. All the files on the disk must be transferred to the directory you just created. To do this, click on the first file in the list, then hold down the shift key of your keyboard and click on the last file in the list. The list should now look like this:

Now hold down CTRL and press C at the same time. This tells the explorer that you want to copy all these files. Next, select the directory you just created by simply clicking on it. The window on the right is now empty, telling you that the directory does not contain any files. Just hold down CTRL and press V at the same time, and the computer will start copying the files from the driverdisk to your harddrive. The second step is now comleted, all the necessary files are copied to your harddrive.
The last step is to include c:\catwsl in your path, that means that the computer knows where to look for the tools that handle the catweasel controller. Select the C: drive in the Windows explorer and click on the autoexec.bat file with the right mousebutton (not the left as usual!). A menu opens where you can shoose what to do with the file. If you choose "edit", explorer will open the file with an editor, and you can do changes to the file. Locate the line that starts with the command PATH, and add the characters ";c:\catwsl" (without the quotes of course!). The line now looks similar to this:

Now choose "save" from the File menu, and exit the editor. The last step is now completed, if you restart the computer, the Catweasel controller is ready to use.
Restarted? Welcome back!
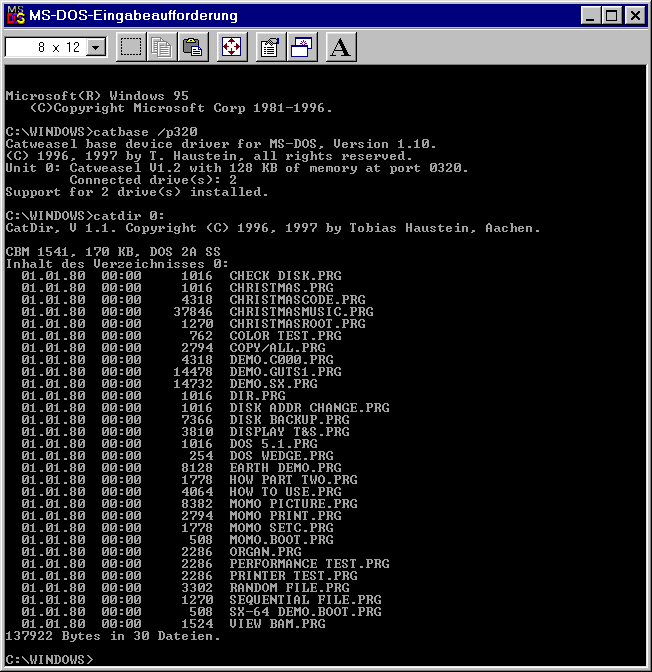
Let's assume you have two diskdrives connected to the Catweasel, a 5.25 inch drive before the twist in the cable, and a 3.5 inch drive after the twist. To Use these drives, the "catbase" driver must be started. The driver is a DOS driver that accepts command line parameter. The most important one is the /p parameter, it tells the driver the base address of the controller card that you have chosen with the jumpers. For this example, we assume you used the factory default setting, which is 0x320. To start the driver, issue the command "catbase /p320" in a DOS shell:

First, let's try to read a disk from the good old C-64. In this example, the SX-64 test/demo disk is inserted in the 5,25 inch drive, and we want to see the directory of that disk. Since the 5,25 inch drive is connected before the twist in the cable (seen from the controller's view), it is drive number 0. Therefore, the command to display the directory of the disk must be "catdir 0:":

As you can see, there are some German words that you may not understand, so here's the translation: "Inhalt des Verzeichnisses 0:" means "contents of the directory 0:". The German word "Dateien" stands for "files". Further, the catdir tool shows a date and time for each file, and they are all the same. This is correct, because the C-64 did not store the datestamp for each file on disk. Since the catdir tool can also display other format's directories, it sets the date to January 1st, 1980.
Now we know that this is the disk we want to use in the C-64 emulator. Everything we need is to generate a d64 file, which contains all the data that is stored on the disk. D64 is a standard, used by most emulators, so the catimage tool supports this standard as well:

Generating the image was only partially successul in this example, because sector 18 on track 1 is unreadable. Despite this, the D64 image has been created under the name "sx64demo.d64" on the D: drive, and can be used by any emulator. D64 files always have the same size, no matter if the disk has all the 664 blocks used or not. The size is always 174.848 bytes. Although the files on the 1541 disk may be packed or crunched, modern archivers like ZIP, LHA, ARJ or RAR may gain some kilobytes, so if you want to publish the files on a web site or send them via e-mail, it is recommended to pack them.
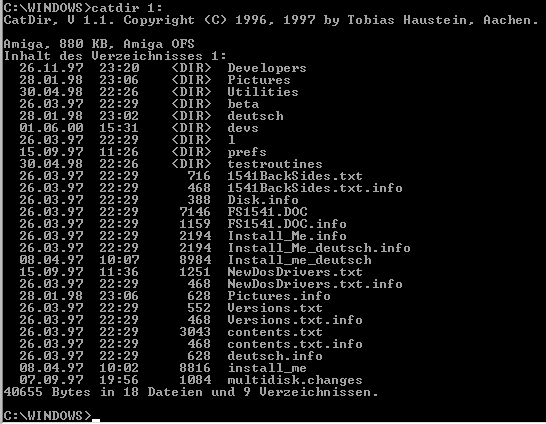
Now let's use the 3.5 inch drive! Since this drive is connected after the twist in the cable (seen from the controller's view), it is drive number 1:, so a simple "catdir 1:" will show the directory of the 3.5 inch disk:

As you may have guessed, this is the directory of the Amiga-Catweasel driverdisk. This time, we're only interested in one file, and we'll copy it to the PC with the CATCOPY tool. If used in the DOS box of Win 9x, the Catcopy tool also allows the use of long filenames:

For Amiga disks, the Catimage tool supports the ADF format (short for "Amiga Disk File"). This file format contains all the data that is stored on an Amiga disk, and you can generate the adf image of a disk like this:

This file can now be used in Amiga emulators like UAE or Amiga Forever by Cloanto. Contrary to D64 images, ADF images can sometimes not be packed, because the Amiga has a processor that is fast enough for modern packing methods. An image of a disk that is filled with LHA packed data can not be crunched significantly, therefore you should check if you really reduce the amount of data by packing. ADF images always have the same size, which is 880K or 901.120 bytes for double-density disks, or 1760K (1.802.240 bytes) for high-density disks.
This document © Copyright 2000 Jens Schönfeld, individual Computers.